If you scroll through my IG you will see A LOT of posts with some sort of hat on, and that is simply because I LOVE HATS!! I want to scream it from the rooftop! It hasn’t always been that way though- only about 6 months ago did I really start getting into hats. Before then, I didn’t really know how to wear hats or accessorize with them, and now… if I don’t have one on I almost feel like my outfit isn’t finished! It just gives your outfit that little extra UMPH!
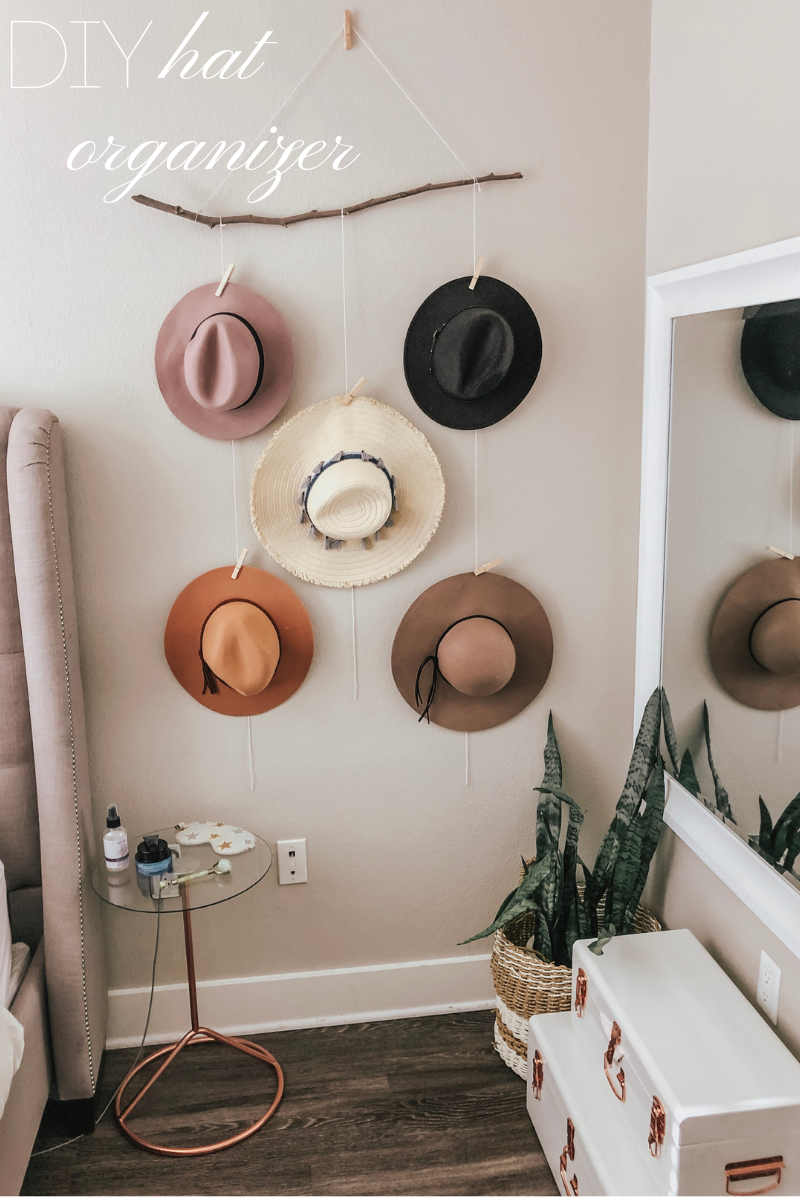
Let’s move on to how I used to store my hats… pretty simple.. I would stack them on top of each other in my closet and every time I would go to pick one out, they would all fall and I would have to pick them up, stack them again, and put them on the shelf. How annoying! I thought- there HAS to be a better way to store my hats, and thats when this little gem came to fruition! Unlike a lot of other DIY wall hat organizers that leave tons of holes in the wall, this one requires NONE (or one, we will get to that)! And not only is it a great way to store your hats- it also doubles as the cutest wall decor ever, and you know I’m all about those two-for-ones!

Another perk about this DIY hat organizer is that it is super easy. Ok I’m not going to lie- it was a littttttle bit more difficult than I anticipated because well… look at it, it looks like a 2nd grade art project, but that is not to say that it wasn’t super duper easy! It just took a little bit more finagling in the beginning than I originally thought!
The total amount of money spent to create this masterpiece was… drum roll please… 10 DOLLARS!!! I repeat T-E-N D-O-L-L-A-R-S!!!! The pack of clothes pins was $6 for a pack of 48 (you can probably find them cheaper, too!) and the string was $4. Clothes pins are very gentile and wont damage your hats! The superglue I already had, and the stick Jon and I found on our walk with Penelope. Boom. Done! If you have these things, you’re ready to rock and roll, baby! (No pun intended with the ACDC shirt)


Materials Needed:
- Stick or wood doweling (Mine is about 3 feet long for reference!)
- String (I got white for a bigger contrast on my walls)
- Super glue or a nail and hammer- The reason I used superglue is because the wall is cement and extremely hard to drill into. If you have regular walls a nail will work just the same!
- Scissors
How to assemble:

- Measure where you want to hang the hat organizer, directly in the middle either super glue one of the clothes pins or hammer the nail into the wall.
- Cut a piece of sting (i cut mine to about 36inches) and double knot one side, then the other. Make sure they are even so that one side doesn’t have more weight than the other.
- Depending on how many strings you want coming off of the stick (I chose 3 because I only had about 3ft to work with) cut that many, I made mine different lengths for a more rustic feel.

4. I then double knotted the three pieces of string on the stick, evenly spaced out (I eyeballed it)
5. Now it’s time to hang it on the wall. If you used superglue, I would allow it to set for about 15-30 minutes if you can! If you used the nail- jump right in! TIP: If you are using the superglue method, I ended up putting my string ON TOP of the clothes pin because at first I put it inside the clothes pin and after adding a few hats it kept falling down!
6. Then start hanging your hats on the string with your clothes pins, but make sure you are dispersing the weight evenly or it will become lopsided! TIP: I learned (after my hats fell through the clothes pin/string 20x in a row) is wrap the string around the back of the pin and then clamp the hat, this way it’s less likely to slide down! Also I would put the hat that you wear most often in the middle so you don’t have to worry about this as much!
That’s it- super simple!! And if you use my tips you will be smooth sailing!!


Be sure to tag me (@blakehealey) and send pictures if you recreate this so I can share it on my IG stories!!!
I have also linked some of my favorite hats below!


Super fun wall look! Great for apt living where storage space is always minimal!